Complete RDR2 Challenge List, Master Hunter Challenges

There's more challenges than we can keep track of in Red Dead Redemption 2, and you're going to need to be one of the quickest shots in the west if you want to complete every challenge on offer. In this Red Dead Redemption 2 Challenges guide, we'll be detailing every single challenge in the game, including tasks which are locked to you before you've progressed a certain amount.

If you instead need any additional information on anything else relating to Rockstar’s wild west prequel, you’ll want to head over to our Red Dead Redemption 2 guides hub. It’s on this main page that you can find a complete list of detailed tips and tricks, as well as an index of our in depth guides.

Red Dead Redemption 2 Challenges List

Just below, we’ll be dividing up our challenges list into the categories that they fall into in Red Dead Redemption 2. You begin with the first challenge unlocked, and you unlock each successive challenge in the list once you’ve completed the previous one.

RDR2 Bandit Challenges

  • Hold up five townsfolk.
  • Rob two coaches or return two stolen coaches to a Fence.
  • Rob the cash register in any four shops, in a single day.
  • Rob three coaches or return three stolen coaches to a Fence, in a single day.
  • Earn a $250 in one state.
  • Steal five horses, and sell them to the horse Fence at Clemens Cove.
  • Rob $50 of cash and valuables from townsfolk and travellers.
  • Steal seven wagons, and sell them to the Fence at Emerald Ranch.
  • Hogtie someone and leave them on the railway tracks, three times.
  • Complete five train robberies without dying or being caught.

RDR2 Explorer Challenges

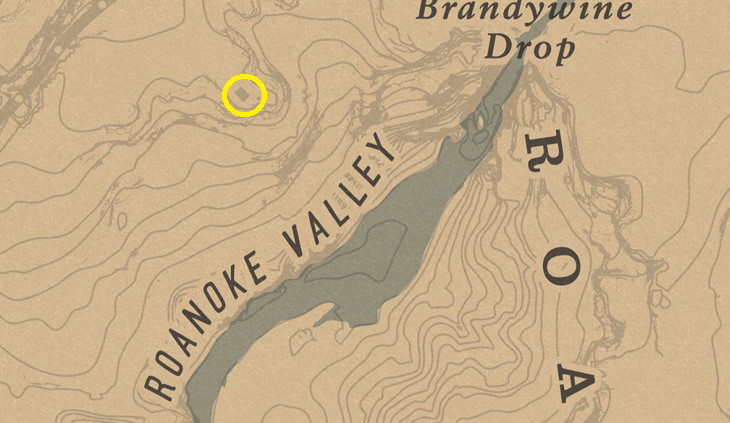
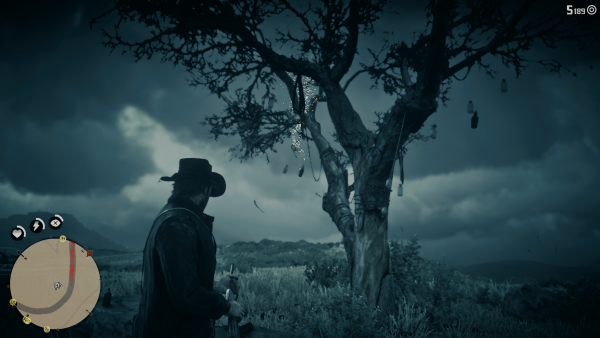
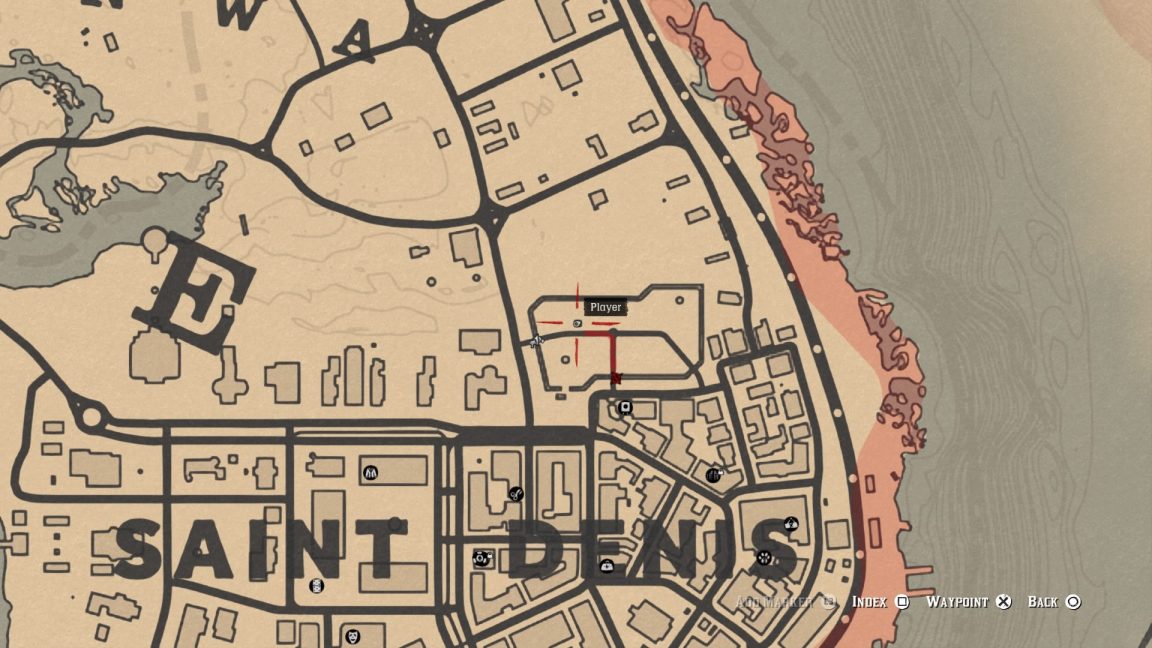
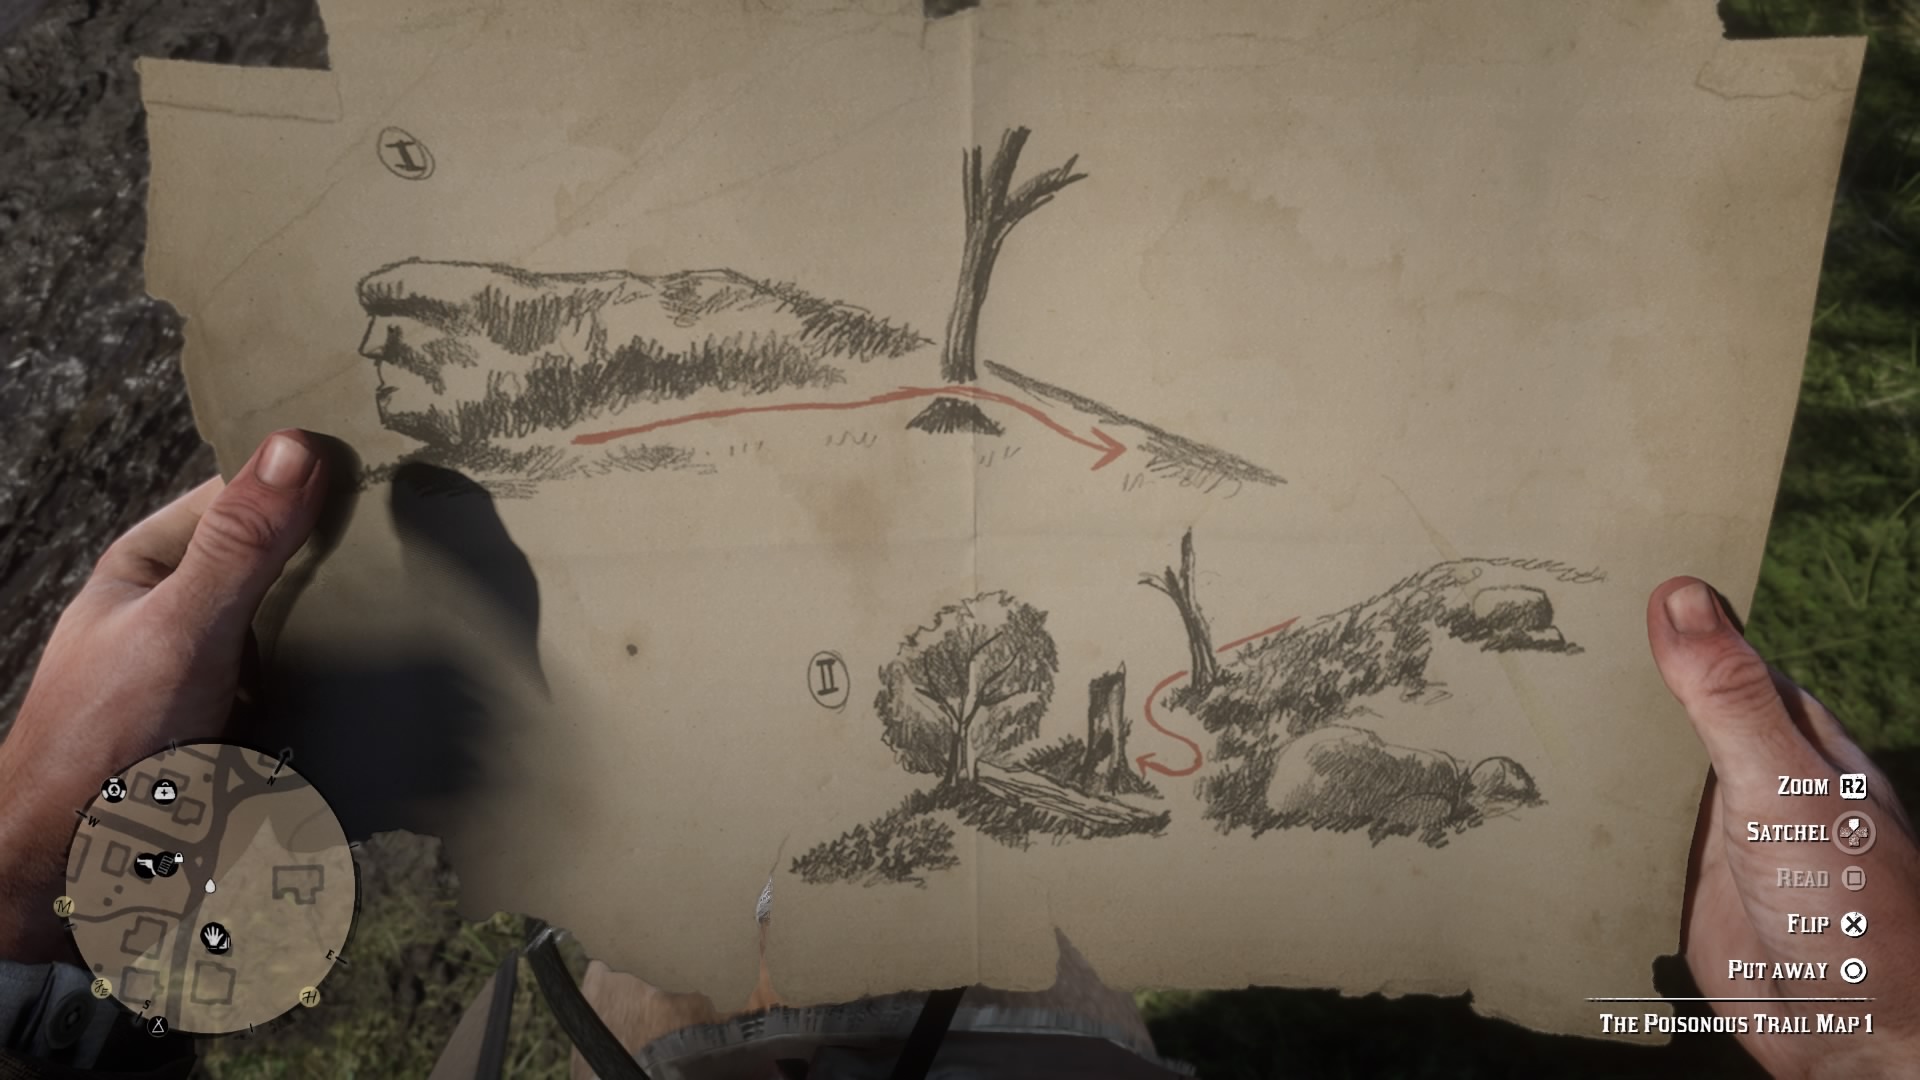
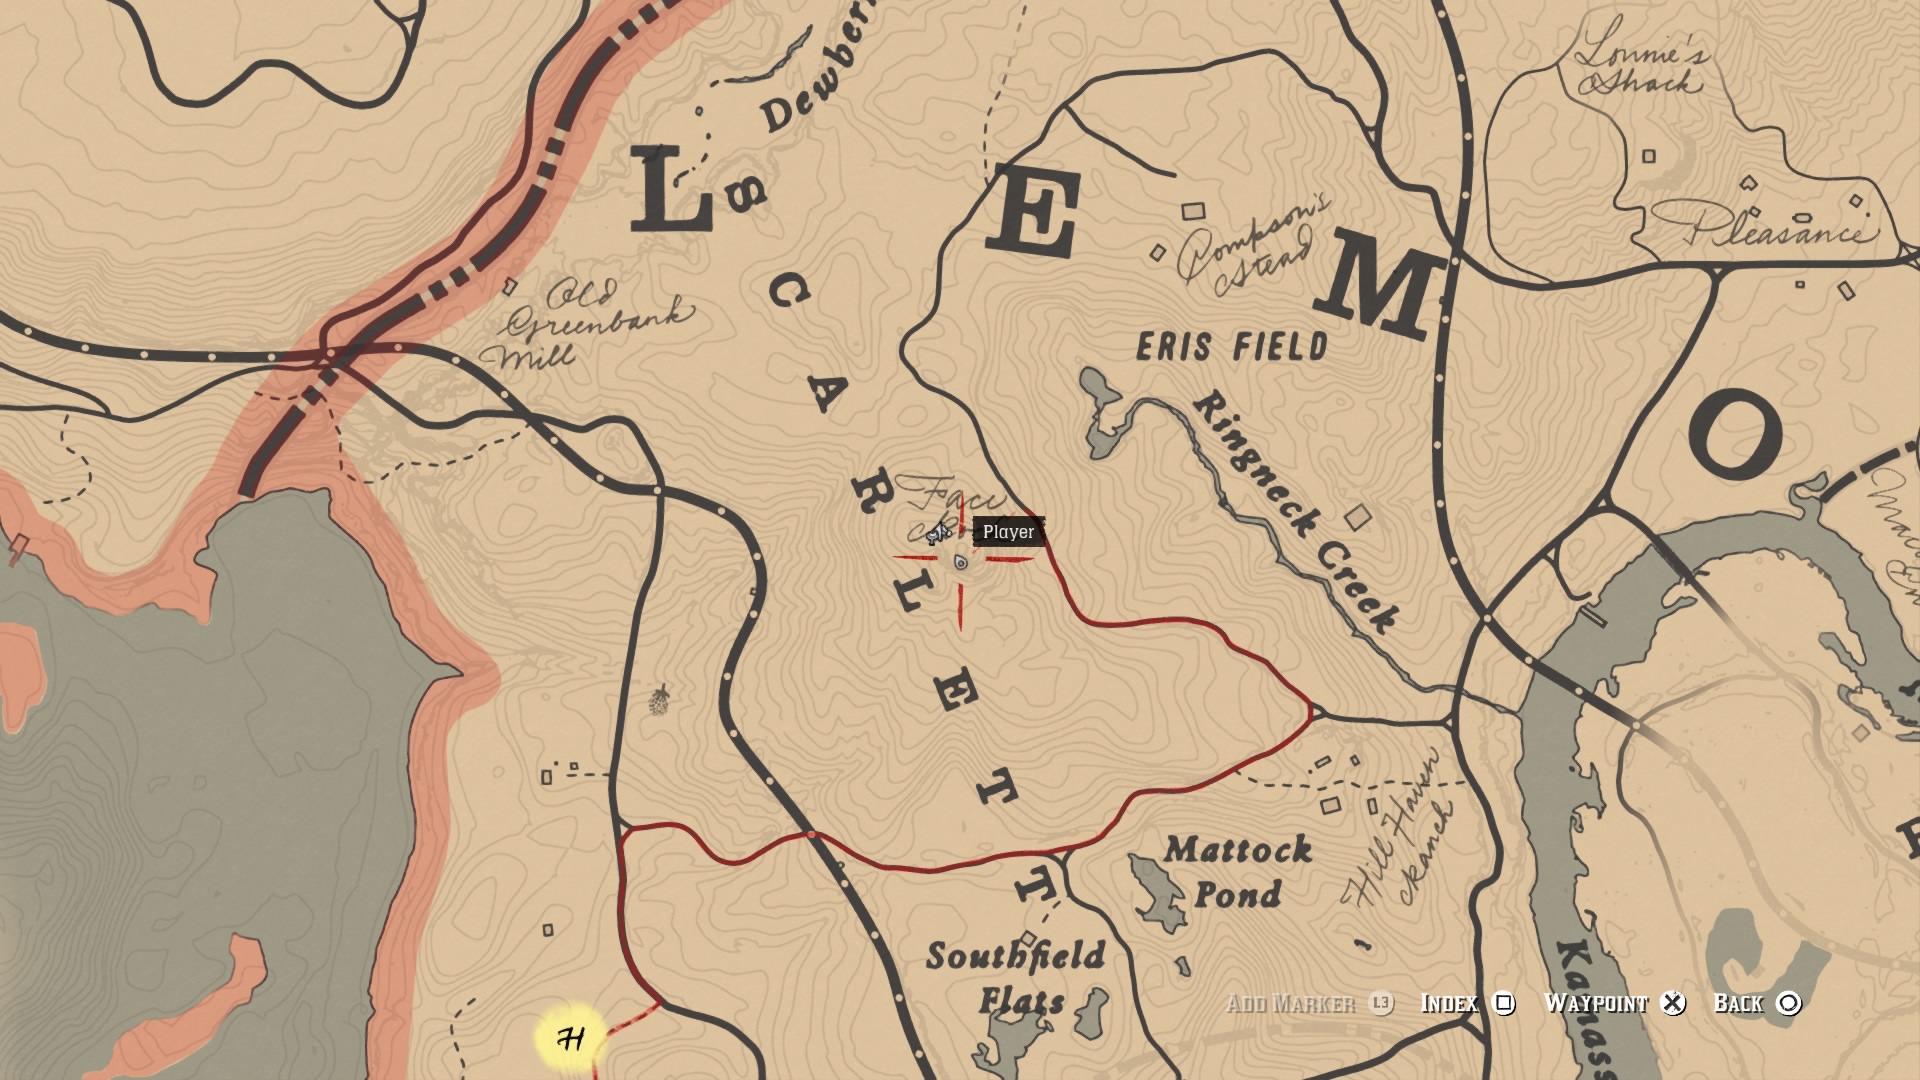
  • Find a treasure map.
  • Find a treasure, nine times.

RDR2 Gambler Challenges

  • Win five hands of poker.
  • In blackjack, double down and win the hand five times.
  • Win three games of five finger fillet.
  • Bust one poker table out in each location (Flatneck Station, Saint Denis, Valentine).
  • Win three rounds of dominoes without drawing any tiles against two or fewer opponents.
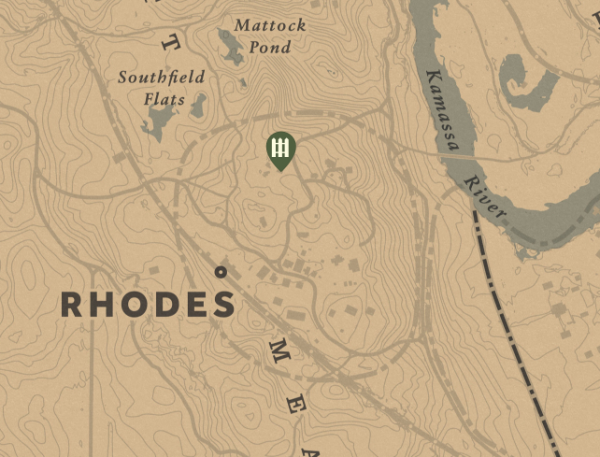
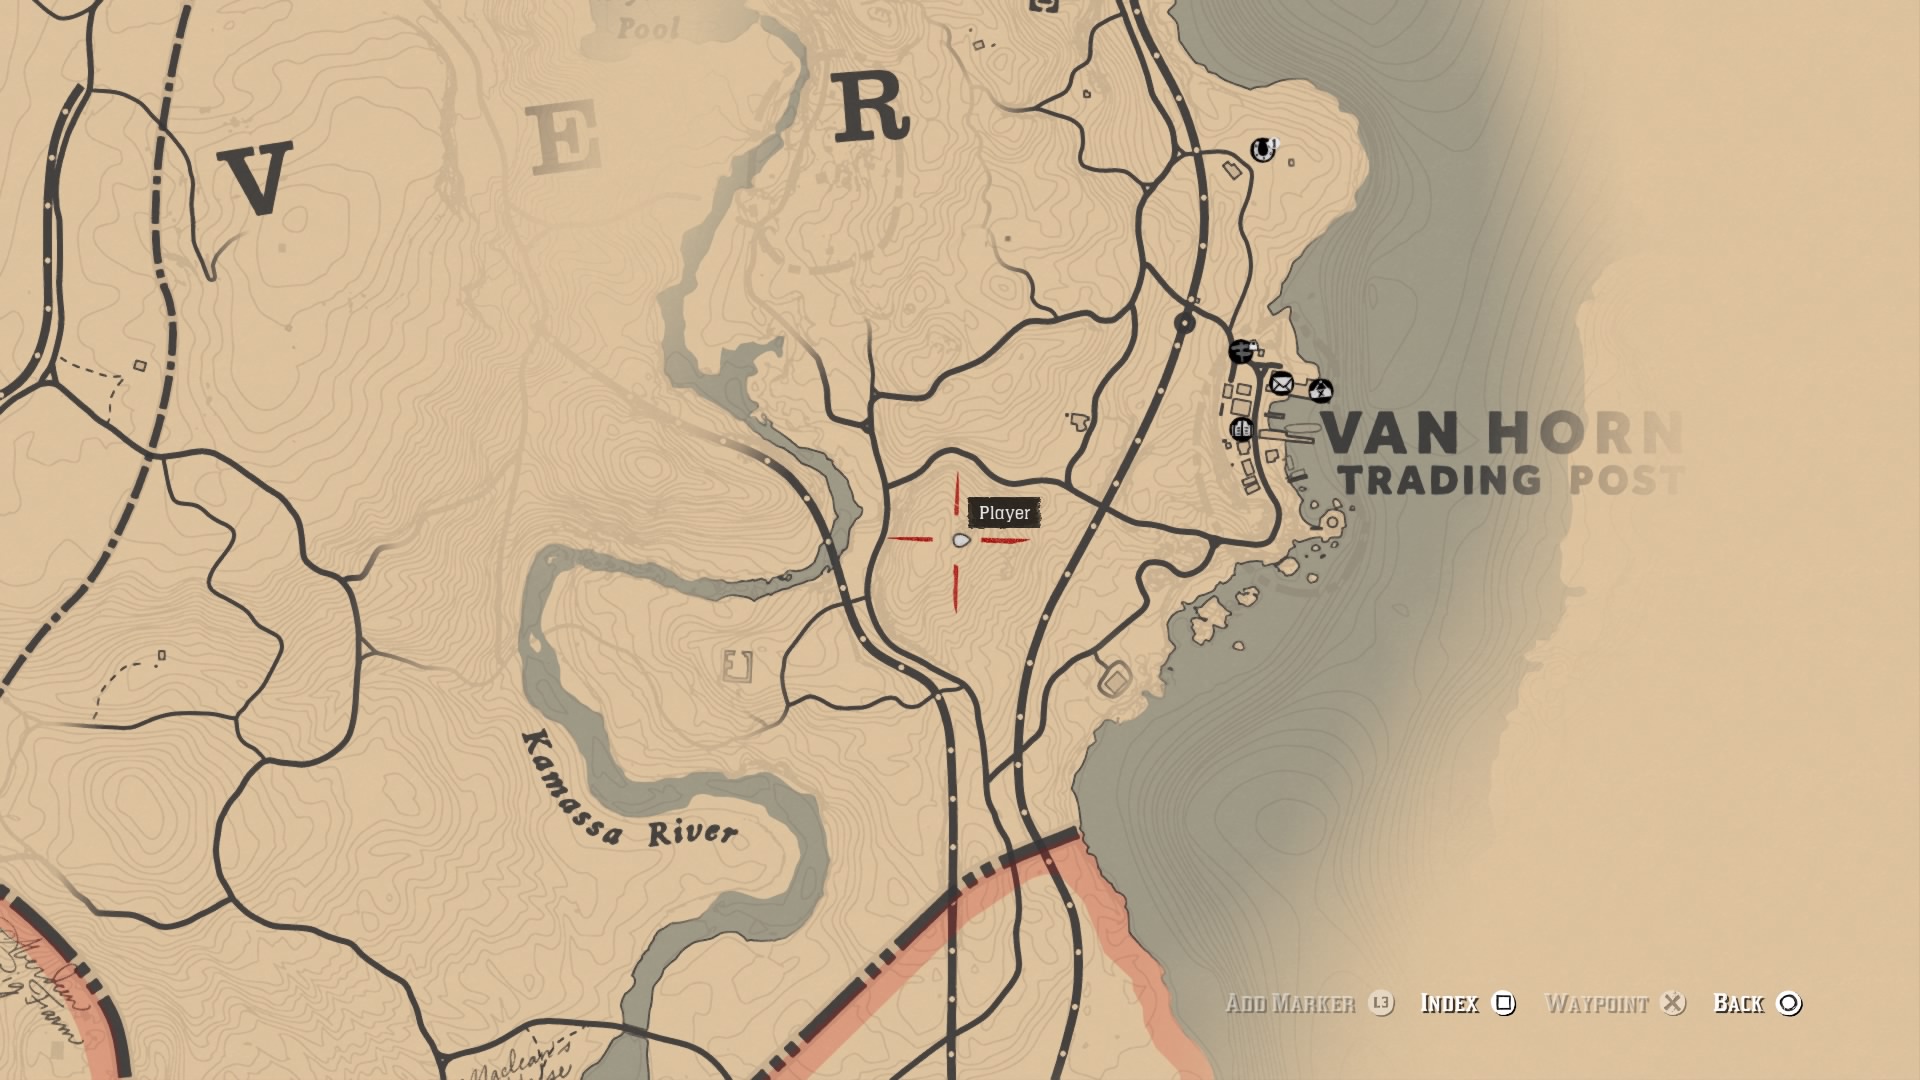
  • Beat the blackjack dealer in two locations (Rhodes, Van Horn Trading Post).
  • Beat the five finger fillet opponent in each location (Strawberry, Valentine, Van Horn Trading Post).
  • Win three hands of blackjack, with three hits or more.
  • Win three games of dominoes in a row.
  • Win three hands of poker in a row.

RDR2 Herbalist Challenges

  • Pick six yarrow.
  • Pick and eat four types of berries.
  • Craft seven items using sage as an ingredient.
  • Pick five mushrooms, and feed them to your horse.
  • Craft nine items using indian tobacco as an ingredient.
  • Pick fifteen different species of herb.
  • Craft five special miracle tonics, and use them.
  • Use oleander to craft six poison weapons.
  • Pick one of each type of herb.
  • Season and cook all eleven types of meat.

RDR2 Horseman Challenges

  • Kill five rabbits while on horseback.
  • Jump over three obstacles in fifteen seconds.
  • Ride from Valentine to Rhodes in less than five minutes.
  • While mounted, drag a person for 3300 feet using a lasso.
  • Trample five animals while on horseback.
  • Ride from Strawberry to Saint Denis in less than nine minutes, without touching water.
  • Kill seven enemies from horseback, without dismounting.
  • Kill nine predators from horseback.
  • Ride from Van Horn Trading Post to Blackwater in less than seventeen minutes, without touching water.
  • Break every breed of wild horse.

RDR2 Master Hunter Challenges

  • Skin three deer.
  • Collect three perfect quality rabbit pelts.
  • Track ten different animal species using your binoculars.
  • Get a clean kill five times.
  • Skin three black or grizzly bears.
  • Kill five cougars with a bow, and skin them.
  • Use bait to lure and kill a herbivore, and a predator.
  • Catch three fish without using the fishing rod.
  • Catch an opossum playing possum.
  • Kill the legendary panther.

RDR2 Sharpshooter Challenges

  • Kill three flying birds.
  • Kill two different animal species in one use of Deadeye.
  • Kill five flying birds while on a moving train.
  • Kill someone from at least 80 feet away with a tomahawk.
  • Kill six animals without switching or reloading a weapon.
  • Kill someone at least 660 feet away with a scoped rifle.
  • Get seven headshots in a row.
  • Disarm three opponents without switching or reloading a weapon.
  • Shoot three hats off people in the same Deadeye.
  • Kill three flying birds with three consecutive scoped rifle shots.

RDR2 Survivalist Challenges

  • Catch three bluegill fish.
  • Hand five animals into Pearson, or a Trapper.
  • Kill five animals with a varmint rifle.
  • Craft dynamite, improved, fire, poison, and small game arrows.
  • Catch a fish in the Bayou from a riverboat, while standing on the train tracks.
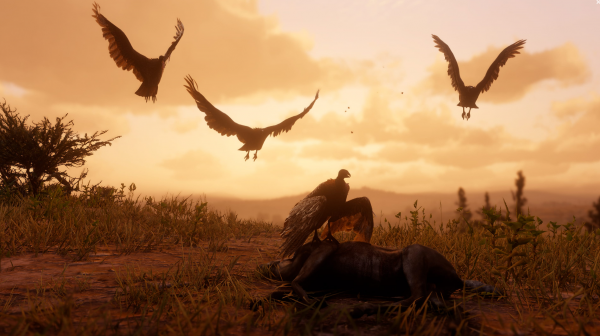
  • Kill an animal while it’s feeding on a corpse, five times.
  • Kill eight small game animals with consecutive small game arrows.
  • Craft a homing tomahawk, improved tomahawk, improved dynamite, and volatile fire bottle.
  • Catch a fish that weighs at least 19lb.
  • Catch one of every species of fish.

RDR2 Weapons Expert Challenges

  • Kill three enemies with a knife.
  • Kill three enemies in ten seconds using throwing knives.
  • Kill three birds of prey using tomahawks.
  • Kill ten enemies with a shotgun, using crafted ammo.
  • Kill five mounted enemies with one throwing knife per enemy.
  • Kill four enemies with one stick of dynamite.
  • Kill four enemies in a row with the same tomahawk.
  • Kill fifteen enemies using a long-barrelled shotgun.
  • Kill nine unaware enemies from behind, using the bow.
  • Kill a grizzly bear using only throwing knives, without taking damage.
And there you have it, a complete list of every single challenge in Red Dead Redemption 2. Once you’ve completed all the challenges above, you’ll unlock the Legend of the East outfit. This has bonuses for reduced melee damage taken, reduced rate at which your cores deplete, increases money and XP acquired, and more.

Cheats

Red Dead Redemption 2 cheats code list: infinite ammo, heavy weapons, max dead-eye, more

There’s a whole mess of Red Dead Redemption 2 cheats, letting players go on a rampage with infinite ammo, heavy weapons and more.


They’re pretty easy to access, but you’ll need to know they come with a set of rules; you can’t save the game while cheats are turned on, and you won’t be able to earn any Achievements or Trophies either. More importantly, the cheat won’t work unless you’ve purchased the newspaper or examined the particular item in-game.

To find some of the easiest cheats, head to the nearest newspaper seller and buy a newspaper. Flip it over and look for the saying at the bottom of the page. Now go to the Settings menu and press triangle or Y to enter the cheat.

Newspapers aren’t the only source of cheats, so you’ll need to examine other items dotted around the game. That “flip” button for turning photographs, maps and other documents over is essential.

Red Dead Redemption 2 cheats – newspapers

Infinite Ammo
Enter: Abundance is the dullest desire.
This fills your boots with endless ammo for all your weapons.

Heavy weapons
Enter: Greed is American virtue
This grants access to a loadout of heavy weapons for you to cause chaos.

Simple weapons
Enter: A simple life, a beautiful death
This unlocks a bunch of average weapons to use.

Stealth weapons
Enter: Death is silence
Yep, this unlocks stealth weapons; throwing knives, machete, tomahawk and bow.

Set Dead-Eye to Level 3
Enter: I shall be better
This will up your Dead-Eye to level 3.

Set Dead-Eye to level 5
Enter: I seek and I find
This maxes out the Dead-Eye meter.

Increase Honor
Enter: Virtue unearned is not virtue
This maximises your Honor so everyone thinks you’re lovely.

Neutralize Honor
Enter: Balance. All is balance
This will reset your Honor to neutral.

Infinite Stamina
Enter: The lucky be strong evermore
This cheat grants infinite stamina for you and your horse.

Fortify Health, Stamina and Dead Eye Bars
Enter: You seek more than the world offers
This cheat refill and fortifies all of your bars.

Learn all crafting recipes
Enter: Eat of knowledge
You’ll instantly know all crafting recipes. You’ll still need to own the ingredients and have to set up camp to craft.

Unlock all outfits
Enter: Vanity. All is vanity
This unlocks all the outfits so you can play dress-up.

Increase Wanted level
Enter: You want punishment
The law will come hunting for you when you max out your Wanted level.

Decrease Wanted level
Enter: You want freedom
Escape the law with this cheat.

Fog of War
Enter: You long for sight but see nothing
This reveals the whole map to the player.

Always Drunk
Enter: A fool on command
This makes you permanently drunk until you turn it off.

Create War Horse
Enter: You are a beast built for war
This cheat creates a warhorse for you to use.

Create Wagon
Enter: Keep your dreams simple
This will magically spawn up a wagon to use.

Create circus wagon
Enter: Would you be happier as a clown?
Roll into town with the circus wagon in tow.

Red Dead Redemption 2 cheats – open world

Fill Health, Stamina, Dead-Eye to Max
Enter: You flourish before you die
You’ll find this etched into a drawer in the Snowfield Shack and it grants you. It completely fills your health, stamina, and dead eye meters.
Create Race Horse
Enter: Run! Run! Run!
You’ll find this on a chalkboard in Fort Rigs. It spawns a fast race horse for you to ride.

We’ll update this list with more cheats over the coming days so stay tuned.


Red Dead Redemption 2 easter eggs

Red Dead Redemption 2 easter eggs and where to find them

With a map this big, you’d expect some pretty good easter eggs to feature in Red Dead Redemption 2.

Rockstar loves its Easter eggs, from letting you play as Bigfoot, and Teen Wolf in GTA 5, to teasing players with something more elaborate like GTA Online’s Chiliad mystery mission.

Red Dead Redemption 2 is no exception, and there are a plethora of surprises in store for you if you’re prepared to poke around the map for a while.

As Red Dead Redemption 2 is so large, some of these easter eggs may evolve and change over time, revealing new steps or surprises along the way. This list isn’t exhaustive and if you find one you think we’ve missed let us know.

Red Dead Redemption 2 easter eggs

Easter eggs come in all shapes and sizes and can reference just about anything. So far we’ve uncovered that GTA 5’s Mount Chiliad mystery is back with the Red Dead Redemption 2 UFO hunt. Make sure you’ve got your X-Files music lined up for this mission.

Speaking of bizarre finds, there’s also a witches shack in the woods complete with a bubbling cauldron. Should you choose to drink from the cauldron, you’ll black out for a while and wake up close by. We’re not sure what else will happen with this one, so keep your eyes peeled.

A bittersweet easter egg to be found near Mount Shann. Our pals at Arekkz have made a video detailing where to find this easter egg and a few others, but if you follow a mountain path around you’ll come across a ginormous skeleton which is a throwback to the Bigfoot quest in Red Dead Redemption


If you head back towards Bacchus Station near Donner Falls, you’ll find yourself a Hobbit House. It’s lacking a circular door and there’s a strange sun icon above it, but it does seem like a respectful nod towards Tolkien’s classic. In the Northeast of the map, you’ll find a meteor-struck house. We assume it was a meteor as there’s mangled bodies all over the floor and a crater in the ground, so who really knows what this mystery is about.
The Nite Folk, who are a lot like zombies, can be found neat Bluewater Marsh. You’ll need to visit the location at night, obviously. There will be a body hanging from a tree and after staring at it for a few moments, the Nite Folk will start running at you from the trees, so it’s best to have a weapon on hand. Once you’ve dealt with these creepy folk, shoot down the hanging body to find a letter telling you about the Nite Folk.
Keeping things macabre for a second, there’s also a creepy cabin lady down near Braithwaite Manor. It’s a tiny little cabin, almost like an outhouse, with a crescent moon cut out and chains all around it. Put the camera into first-person and you can have a wee peak through the hole, but she might grab you. It’s a clear reference to Undead Nightmare as you can see her face is a bit of a mess and she’s spouting gibberish.
For all you Jungle Book fans out there, you can find Kaa the snake hanging from a tree near the “O” in Lemoyne on the map.
There’s a throwback to RDR1’s Bonnie MacFarlane. In the original game, Bonnie is one of the last of her family and feels it is her duty to look after the homestead and take care of business.

We didn’t know that she was married before she ran into John and you can meet Bonnie’s ex just South of Flatneck Station. In his pocket, there is a letter to Bonnie, full of regrets and promises that will never be fulfilled. I’m not crying, you are!

There’s also the remains of a pilot still strapped into their flying machine like the one Marston helps a man build, which you can find North of Big Valley.

Some players claim to have found an easter egg that’s a hidden message about long overtime hours and crunch at Rockstar, but we’ll leave the interpretation up to you.

Where to find the derailed train and hidden treasure

Red Dead Redemption 2: where to find the derailed train and hidden treasure

Trains are a big feature in Red Dead Redemption 2, and not just for fast travel.
If you wander across the bridge at Granite Ravine, take a peek over the edge and you’ll see a derailed train, like something out of Back to the Future part three.
In one of the carriages, you’ll find a chest that has a coin bag, some dollar bills and a large bag of jewellery you can sell. There’s also a verticle carriage with some gold bars and pirate rum in it, but you’ll need to do a bit of climbing to get there.

To get to this carriage, you’ll need to follow a path on the cliff to the left. Once you’ve jumped over some chassis, take a look at the left of the cliff wall and you’ll see an edge you can almost reach.
What you’ll need to do is sprint up to the wall and climb it, then sprint up the path to the ledge above. It can be a bit frustrating to do, especially if Arthur is ragdolling around the place.
Once you’re up on this ledge, turn to the right and you’ll see another ledge within jumping distance. Sprint and jump to the other ledge, and you should be able to see the open carriage to your right. You’ll need to sprint and jump again to land inside the carriage and not ricochet off the edge four times as I did.

Once inside the vertical carriage, jump to the bottom to find the two gold bars, some ammo and some pirate rum. You can find more gold bars and where to sell them in our guide here as well as our guide on how to get rich quick.

Where to find the Whisky Tree

While you’re out galavanting in the wilderness, keep your eye out for the Whisky Tree in Red Dead Redemption 2.


If you head East from Flatneck Station you’ll come across the Whisky Tree. Sadly, this tree doesn’t actually produce any whisky, but there are a few dozen bottles tied to its branches and one of them has a gold nugget inside.
It’s standing on its own so is quite easy to see and there’s a convict wandering around the area whose shackles you can choose to shoot off or ignore, but that’s for another time.

Once you’re close to the tree, use your Eagle Eye and you’ll see one of the bottles is glowing. Shoot it, and once it hits the ground you’ll see that it dropped a gold nugget that you can sell. You can find out where you can sell your loot and where to find more gold items here.


Fence locations

Red Dead Redemption 2: All fence locations, where to get the lockbreaker

There are more ways to sell your loot than heading to the general store in Red Dead Redemption 2.
As some of your loot can be obtained through questionable means, such as a robbery, you’ll need a fence to sell your items to. There are four fences to be found across the country that will take those hot items off your hands. Here’s how to unlock every fence in Red Dead Redemption 2.

Red Dead Redemption 2 where to find a fence

The fences will sometimes be found hidden in a shack or in a storefront, depending on their locations. As well as buying looted items, they also sell special items such as crafting recipes, masks, explosives, and melee weapons.

Emerald Ranch Fence

The first fence can be found near the Emerald Ranch and you’ll be introduced to him during the Pouring Fourth Oil mission in Chapter 2. He’s the only fence that will buy stolen wagons from you.

New Hanover Fence

The next can be found in Van Horn Trading Post in the East of New Hanover.

Rhodes Fence

Another fence is located in the Lemoyne region, just Northeast of Rhodes.

Saint Denis Fence

The last fence can be found in in the East of Saint Denis. This is the fence who you can sell the majority of your gold bars to for $500 each.

Where to get the lockbreaker

The lockbreaker is a tool you’ll use to open lock boxes and other sealed items. Using the lockbreaker means you won’t make a loud noise when looting. The only other way to open a lock box is to shoot the lock off, which obviously attracts attention. You will earn the lockbreaker during Chapter 3’s mission Friends in Very Low Places. If you need to buy one before that, you can get one from the fence in Saint Denis for $25.

Trapper location

If you’ve been hunting down legendary animals in Red Dead Redemption 2, you’re probably going to want to know how to turn those rare pelts into unique outfits.


To get the unique hunting outfits in Red Dead Redemption 2, you need to sell legendary animal pelts to the trapper. But where exactly is the trapper?

Red Dead Redemption 2 trapper locations

The main trapper in Red Dead Redemption 2 can be found in Saint Denis, the game world’s big city. The easiest way to find him is the bring up your map, select index, then narrow it down the the trapper.
The icon is a paw print. Set a waypoint and make your way there. Sell your pelts to him, and it should unlock some of his wares, assuming you have the required components to purchase them.

It goes without saying, but you really don’t want to sell these pelts elsewhere if you want to unlock the outfits. It’s a bit of a waste if you do. If you happen to drop the pelts in the wild, they will be available to buy back at the Trapper, which is nice.

If you’re early in the story, I’d personally hold off tracking down the pelts and travelling to Saint Denis too soon – it’s a really special experience to ride into that place for the first time, and you don’t want to be too familiar with Saint Denis when the story eventually takes you there. Luckily, there are a couple of other trappers.

There’s another trapper Southwest of Valentine, out in the wilds. He’s slightly Northeast of Riggs Station. Now you need stuff to take to him, so here’s how to bag perfect pelts in Red Dead Redemption 2.

Check out our in-depth Red Dead Redemption 2 hunting guide for how to get the best pelts.
Happy hunting!


Shack locations

Red Dead Redemption 2 Shack locations – how to find all the little stories dotted around the world

There are shacks littered all over Red Dead Redemption 2’s map. If you want 100% completion, you have to visit at least a few of them.


Saying that, Rockstar has done a brilliant job of making sure many of them are well worth the trip. Each has its own story to uncover, some of which are obvious and some of which are certainly not.
Here we’ll show you how to find each of them and give you an idea of what to expect.

Hani’s Bethel

This shack is tied to Red Dead Redemption 2’s UFO easter egg. To find the shack, open up your map and look for Emerald Ranch. Just above that, to the East of Heartland Overflow, between the ‘N’ and ‘O’ of ‘NEW HANOVER’, you should be able to see a building by a pond. Head there.

Dormin Crest

This shack is located in the icy Northwest of the map. It is West of Deadboot Creek and Spider Gorge. Inside, you’ll find a Cigarette Card and some provisions.

Snowfield Shack

Just South of Dormin Crest, you can also find Snowfield Shack. Etched on the inside of a drawer there, you can see a cheat code: You flourish before you die. There’s also come other bits to pick up.

Fairwale Shanty

This one is in the Northeast of the map, almost directly North of the ‘O’ in ‘AMBARINO’. Here you’ll find two dead bodies, as well as a gold nugget, platinum stopwatch, and some jewelry inside lock box.

Dodd’s Bluff Cabin

This one is directly West of Fort Wallace, over the river. It’s just South of Window Rock. Inside you’ll find two dead bodies, a gold nugget, some salmon, and hair pomade.

Clawson’s Rest Shack

From Dodd’s Bluff, use the road to follow the Dakota River South and eventually you will arrive at Clawson’s Rest. You have to break the lock or kick the door in to enter. Inside you will find an awful scene that you can piece together with the notes and visual clues inside.
In the shack there’s a book: Otis and Miller the Arabian Prince. There are also three Cigarette Cards and some resources.

Martha’s Swain Cabin

This one is East of Moonstone Pond and West of Annesburg. Inside you will find a tale of love and loss, as well as some canned goods and jewelry.

Ridge View Cabin

This one is only available during the epilogue and, as far as I can tell, contains nothing of interest. It’s a new build house and hints at the world changing. In the grounds you can pick some golden currant, a Dead Eye herb, as well as some wild carrot.

Osman Grove Cabin

Just Southwest of Ridge View is another cabin. This one has its own story, along with the expected corpses. Inside there’s a book: Otis Miller and the Black-Hearted Lady. There are also some provisions knocking about.

Old Trail Rise Shack

This one can be found in The Heartlands, near Dewberry Creek. This burnt out shack has a basement to explore. Inside you will find some Valerian Root, which gives you an injection of Dead Eye experience.
There’s also a Cigarette Card down here. And, in the Southeast corner, there’s a hidden stash of 50 dollars behind one of the stones.

Robard Farm

This one can be found North of Rhodes. Before you go in, note the trail of blood from the front door. Follow it behind the house to uncover a sad story of unrequited love.
Search the house itself for some provisions, cash, and a Cigarette Card.

Bayall Edge Shack

This one is deep in the Western part of the Bayou. There’s not much here in the way of collectibles, but it hints at what happened to Armadillo.

Argil Rise Cabin

Just South of Rhodes, this is another of the new builds that are only available in the epilogue.
Crawdad Willies Shack

Just East of Shady Belle, this cabin in the swamp actually has some living people to interact with. Inside you will find a dead man and a trail of blood. Follow it to find two prisoners. If you decided to free the living one, he’ll tip you off to the location of some cash.

Old Harry Fen Shack

This one is Southeast of Braithwaite Manor and is home to an ex-slaver. Inspect the floorboard in the room with the shackles to find a family photograph. There’s also a newspaper clipping for more backstory.

Shepherd’s Rise Cabin

North of Strawberry, this is another new build available only in the epilogue.

Vetter’s Echo Cabin

This one is almost directly North of the ‘W’ of ‘WEST ELIZABETH’. There’s a Cigarette Card on the porch and another Cigarette Card inside. Just, erm, be careful when you enter.

Lenora View Cabin

This one is above the ‘E’ of ‘ELIZABETH’. There’s a letter on the porch pertaining to a character you might remember.

Bear Claw Shack

This one is Southwest of Blackwater and in Tall Trees. It looks like a collection of broken shacks, but there’s a well on the grounds that you can climb down into. Down the well is a lockbox with 90 dollars inside.

Le Tresor Des Morts treasure maps and locations

Le Tresor Des Morts is an extra mission in Red Dead Redemption 2 that’s only available to those who pre-ordered the Special or Ultimate Editions of the game. If you didn’t you’re just not going to find this map as unlike other treasure maps in the game it isn’t sold by a fence later down the line.

Where to find Limpany

You’ll have to find the map first, so to do that you’ll need head over to Limpany, which is the old burned down town directly north of Flatneck Station. Your base camp at Horseshoe Overlook is close by, so the quickest way to find it is to head back to camp and start from there.

There’s a strongbox in the Sheriff’s office that has a gold bar in it. There’s a glitch you can currently exploit to get unlimited gold bars, so check out our guide for how to do it.

Where to find the Le Tresor Des Morts map

Once you’ve gathered as many gold bars as you can, head to the jailhouse – it’s the only building still standing.
Inside you’ll find two dead prisoners in jail cells and the one lying on the cot has the rolled up map beside him. If you don’t see it, sorry, you didn’t pre-order your version of Red Dead Redemption before the deadline.
Take the map and examine it to see that it’s prompting you to look underground for the next map. You’re going to head to Saint Denis docks and look for a big building called the Cornwall Freight Station.
You need to be near the docks, and head down the steps you can see the left of this screenshot below. Hug the wall at the bottom keeping it to you right, and keep walking until you drop into the water.
The water is only waist height, so follow the edge of the docks to a steel gate that opens to an underground passage (that connects the docks to the Cornwall Freight Station). It’s here that you’ll find the map behind a pocket of dirt in the wall, next to the only crate in the corridor. You should also see an X carved into the beam here so it’s easier to find that you might think.

This next clue is a rhyme rather than a map, and it reads:
  • Where the floods rise up,
  • But the dead stay dry,
  • And the colored light falls,
  • When the sun’s in the sky.
  • There to your left you’ll find our wealth,
  • It’s no good to us without our health.
There’s also a small sketch on the back of the note.
The dead stay dry in the cemetery, and the coloured light it refers to is a stained glass window.
Your final destination for Le Tresor Des Morts is a short walk to the cemetery in Saint Denis.
Turn left/west at the dome in the centre, and look for the big building with the stained glass window. Inside you’ll find a hole in a wall. It’s just to the west of the dome. Inside you’ll find six – six! – gold bars. You can sell all of these to the local fence for $500 apiece. Holy moly.

The Poisonous Trail treasure map

Red Dead Redemption 2: Poisonous Trail Treasure Hunt guide and location

We hope you’ve got a lantern. You’re going to need it.

To begin the Poisonous Trail Treasure Hunt in Red Dead Redemption 2, you first need to start the Gunslinger’s side quest, The Noblest of Men, and a Woman.

It’s a particularly rich side quest, as it gives the player a bunch of new and unique weapons, but it also introduces you to Flaco Hernandez, who hides out in the hut at Cairn Lake, in The Grizzlies. Once Flaco is dead, search his cabin to find the Poisonous Trail map.
The Poisonous Trail Treasure Hunt
Now you’ve got that, examine the map and you’ll see the rocks resemble a face. That’s why it’s known as Face Rock, and you can find it on your map just west of Ringneck Creek. Find the hollow tree here, and you’ll be able to get the second map from inside of it.
Looking at this map the drawing kind of looks like a snake, right? It doesn’t seem to be marked on the map, but it’s a mound directly west of the trading post Van Horn, on top of a steep hill. Once you get there, poke around the stones that look like a nest of snake eggs to find the next treasure map.
The third and final map shows a waterfall and you want to head to Elysian Pool, north west of Van Horn. It’s not too far to travel. This is also the spot for a Legendary Animal so bring your fishing rod and you can bag that challenge as well.

Note: This is the same secret cavern you’ll enter to find the final reward for the Dreamcatcher challenge – but you will take a completely different route through the chambers.

Walk through the waterfall to find a secret chamber and light your lantern otherwise you won’t be able to see a thing. climb up over the first ledge and once you drop down the steep drop look for another steep path branching off to the right and head down it. If you come to a massive chamber with natural light breaking through you’ve gone too far sop head back.

You’ll come to a small triangular tunnel entrance that you have to crouch to go through. Take the right hand path at this fork on the other side. Once this chamber opens up, stand, and look to your left. You’ll see a ledge that you need to run and jump off. You’ll actually land below it, and then you can climb up one last ledge and search a boulder to find 4 gold bars worth $500 each when sold to a fence.
To get out of the chambers, head back to the last junction where you went right, but take the left hand path. Or, if you die, you’ll spawn back outside the cavern.